|
Products
Recently Viewed
|
Purchasing Tips
- Unless you have to use a 2'x2' panel, go with a 2'x4' panel. Not only are they cheaper then two 2'x2's but also, there will be fewer visible seams, thereby, providing a nicer look. Finally, the installation will be relatively faster since there will be fewer panels to install.
- It is highly recommended that you never nail or screw the panels into drywall. Drywall is not strong enough to hold the panels with a simple nail or screw.
- Always use plywood that has been secured into the studs of your ceiling and then install the panels into the plywood. Plywood is obviously a small additional cost; however, not only will it be safer but also, it eliminates the hassle of having to level each individual panel one by one.
- Always use cone head nails for nail up applications. The cone heads are preferred to flat heads because they appear to be apart of the pattern, and, thus, are less obvious and provide an elegant look. Additionally, never use screws as they will sheer the panel and will be very noticeable.
- Make sure you get what you want when it comes to the finish. For example, antique plated is different then antique painted (also referred to as antique faux painted or antique faux plated). Antique plated is first heavily plated, then sanded, treated, and finally, polished to give it a true antique look. On the other hand, antique painted is usually painted in the desired finish and then, sprayed with a darker tint of that finish to represent a faux antique look. There is a clear difference between the two and a true antique plated panel will be more expensive.
- For smaller areas, use patterns that have a smaller pattern size (3in., 4in., 6in.), and for larger layouts select a pattern that is larger (12in., 24in.).
- Keep in mind that the highest quality of detail and texture of tin ceiling tiles is obtained from steel panels that are manufactured from original molds, as oppose to aluminum plates and those panels that are made out of duplicated molds.
- Take into consideration the opening between panels for different application types:
- Nail-up applications will typically have a quarter of an inch overlapping for each panel and will cover seams much better, giving the ceiling a continuous pattern.
- Lay-in, also known as drop-in, applications have a gap that will depend strictly on the t-bars width, which causes each panel to be distinct. Lay-in panels are mainly used in commercial applications where access to the ceiling may be required through temporary removal of the ceiling tiles.
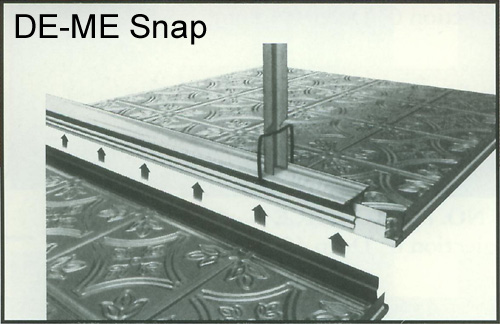
- There are two types of panels that snap into place. One of them is the 2'x2' tin ceiling panels that snaps into one another using the backsides, which reveal a considerable gap between each tile. The other form of snapping ceiling panel is the DE-ME Snap. The DE-ME Snap snaps right into a specially designed grid that creates an almost gapless look and is mainly used in commercial applications to eliminate the t-bar grid system. For a better idea of how the DE-ME Snap works see the picture below.
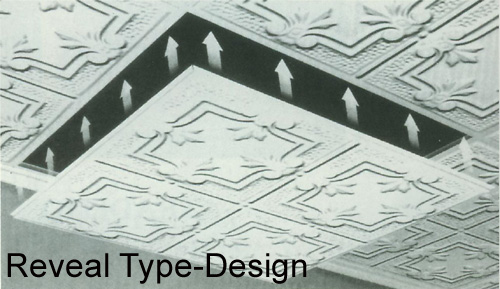
- Finally, there is a reveal type-design that uses t-bars, which are similar to lay-in but are different in that the reveal type-design projects outwards (3/8"), taking the attention away from the t-bar. For a better idea of how reveal type designs work see the picture below.
Installation Tips
- Wear gloves when handling the tin ceiling panels, panels are very sharp. If, during installation, a panel drops, let it go! Do not try to grab it with your bare hands.
- Install ½" plywood to the ceiling by nailing it into the joists. For backsplash application, ¼" plywood is adequate for holding the nails. If your ceiling is cracked or sprayed with acoustic, it is unnecessary to remove the acoustic or repair the ceiling first. Do not install a tin ceiling by nailing it directly to a plaster or drywall ceiling.
- Use 1" paneling nails or order factory supplied cone head nails for installation. We recommend cone head nails for the field panels and cornices (including molding & girder nosing), and paneling nails for the filler, as they are less noticeable in the filler panels.
- If you have decided on a wall-to-wall ceiling layout, do not use a wall to align the panels. Walls are seldom straight and are sometimes curved. Each additional panel installed will magnify a slight variation in the starting line of the panels. Instead, find the center of each of the four walls and snap a chalk line to determine the center of the ceiling. Using the centerline as a guide will keep your panels straight.
- If, after you have finished installation and a seam is especially noticeable, it can be wedged tighter by placing a small wood block against it and tapping with a hammer.
- After installation, clean the panels with an odor free paint thinner so to remove any soil, oil and fingerprints. When painting, use an oil-based paint. Some brands of exterior paints are made with a U.V. inhibitor, which will greatly reduce a yellowing effect that takes place over time. It is usually easier and less expensive to paint your ceiling after installation, this also assures that the nail heads and any scrape marks will also be painted.
- Tin finish panels should be either painted or treated with polyurethane to preserve them from rusting overtime. For a clear tin finish, after installation, clean the panels with a paint-thinner, such as mineral spirits. Without touching the panels, which can leave fingerprints, apply two coats of non-yellowing polyurethane. Use polyurethane made especially for metals, not wood. We suggest Rust-Oleum Clear Glass Enamel polyurethane. Apply one coat of polyurethane every 4 years in order to protect the panels. For protection against any moisture or water leaks, it is recommended to treat the backside of the panels with a coat of oil-base primer after cleaning with a paint-thinner but before installation. If the panels are going to be painted, after priming the backside of the panels and installing the panels clean the panels with a paint-thinner. Than prime them with an oil-base primer. Finally, paint them with an oil-base paint. The plated and pre-painted panels have a polyurethane coating to preserve the finish that does not need any more treatment on either side. For use in a bathroom, we recommend priming the back of the steel finish panels before installation for protection from humidity.
|

 6in Tin Ceiling Patterns