|
Products
|
Frequently Asked Questions
General Questions
- Is there a minimum order size?
- No.
- Do you accept personal checks?
- Yes, but we do not ship the order until the check has cleared.
- How long does it take to receive my order?
- Usually all products are in stock and it takes two weeks to receive your order. However, antique plated panels (Antique Copper, Antique Brass, Antique Pewter) are custom orders and a lead time of 4-6 weeks is required.
- Do you send out samples?
- Yes, you may purchase tin ceiling samples here.
- Does the price of the panels depend on the design of them?
- No, with the exception of design numbers 508 & 518.
- Does the price of the panels depend on its finish?
- Yes.
- Can tin ceiling panels be used in a place where there is a good deal of moisture, such as a bathroom or near the beach?
- Yes, but in these kind of situation make sure you prime the backside heavily. In addition, if you do not plan to install the panels right away and they are going to be stored in an area with moisture, you must prime the tin finish (unfinished or steel) panels upon receiving the panels to avoid any rusting due to moisture in the area. Pre-painted and plated panels have been treated and do not need any treatments.
Backsplash Questions
- What is a backsplash exactly?
- A backsplash is a material that is installed behind or above kitchen countertops. Backsplashes are meant to prevent the spilling or splashing of liquid substances, such as water and grease, down the wall.
- How safe are backsplashes?
- Unlike some other tin ceiling manufacturers, we use backsplashes that install into wood instead of drywall. This is because drywall and plaster alone are often not strong enough to secure tin panels. Additionally, for a kitchen, which is where most household fires begin, backsplashes are extra useful. Steel panels provide almost perfect protection against fire, water, dust, vermin and rodents. In fact, they can resist heat over 1,350 degrees Fahrenheit. Plus, they do not crack and never shrink, warp, peel or fall off. For more information on how safe backsplashes and Classic Ceilings' tin products are in general, please see our fire test page.
- How many panels will I need?
- If the width of area between the countertop and the cupboard is 18", divide the length of the area into 4´ and round it to the highest number that will provide you the number of required panels. If there are different areas to cover or the width is not 18" or if you need any other assistance, please contact Classic Ceilings. We will provide you with a free layout for your kitchen backsplash remodeling.
- How do I clean my backsplashes?
- Any mild dishwashing soap is good for clean your backsplashes. Also you can clean your backsplashes as often as you want.
- How do you install a backsplash?
- Please see our installation page for a detailed outline of installing a backsplash.
Installation & Maintenance
- When painting the panels, should they be painted before or after installation?
- Either application works out, but make sure to prime the backside before installation to prevent any future rusting resulting from water leaks. If you decided to paint before the installation, you need to do some touch up over the nails and caulked areas later.
- Is it better to paint with spray paints or paintbrushes?
- Preferably, use spray paints to avoid brush marks, especially in low ceilings.
- How do you decide about the overlapping side of the panels?
- The side of the panel that corresponds to the side of the room from which you look more often to the ceiling should lay underneath the adjoining panel. As a result, when you look at the ceiling from that side you will see the overlapping side and you do not see the seam. Also, consider the effect of the prevailing light, normally the farthest side of the panel from the light should overlay on the side of the adjoining panel.
- Do I need to pre-drill the panels?
- The nails will go through the panels and overlapping edges with only hammering them. Only on the corners, where four panels all lay on each other may require a pre-drill.
- How do you overlay the cornices?
- Each cornice has about an additional quarter of an inch on each end for overlapping and they overlap very easily.
- How do I reduce the gap between the seams of the cornices?
- You may nail or screw a proper wood block to wall and/or ceiling and then nail the seam into this block at a few locations with flat head nails, since flat heads are less visible.
- How do I join the cornices at the corners?
- (A) For inside corners (concave corners) the joints have to be coped as shown below. On one side, no mitering is required; install the corner flush with the wall and then use the coped cornice to install over the first cornice.

(B) For outside corners (convex corners) the joints have to be mitered as shown below. In this case, you may either directly use a mitering saw to cut the cornices or use a cardboard as a pattern. First cut two cardboards the same size as the face of the cornice. Then cut these cardboards by a mitering saw. Next, check that the cardboard fits accordingly and properly in the corner. Finally, lay the cardboards on the cornice and cut the cornices accordingly using a tin snips.

- Do pre-painted or plated panels require any after treatment?
- No, panels are ready for installation.
- Do I need to caulk the panels after installation?
- Caulking is recommended to close very small gaps, but it is not necessary. If you are not going to paint over the caulking, make sure that you use a small amount of caulking material.
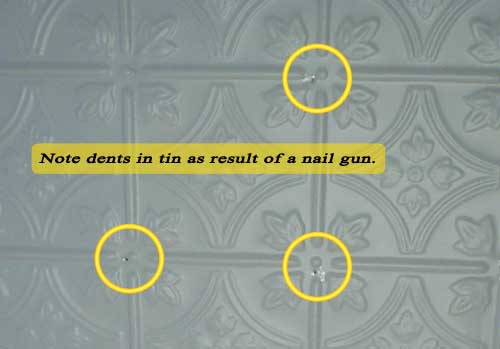
- Can I use nail guns instead of hammering the nails?
- We do not recommend this since there is a good chance that you may hit and dent the panels in some locations very close to the nails, causing dents in the tin as illustrated in the picture below.
- Can I use a glue gun to install the panels?
- We do not recommend glue guns since the glue does not have a lasting hold as strong as nails and it may not be safe.
- Is it okay to paint over pre-painted white panels?
- Yes, but you need to remove the finishing coat of the panels.
- How do I cut the panels?
- Use tin snips for making small cuts and cutting the corners and curves. Use tin snips or a guillotine paper cutter to cut the larger pieces and panels. You may purchase tin snips in our accessories section.
- Is it okay to screw the tin ceiling panels to sheetrocks or drywalls?
- We strongly recommend you DO NOT do this. As it has been observed in similar applications, drywalls are not strong enough to hold the screws overtime.
- How do I clean my tin panels?
- You may simply just dust them off or if they are dirty you can apply a mild dishwashing soap. Also, you can clean as often as you want.
- How do you install a tin ceiling?
- Please see our installation page for a detailed outline of installing a tin ceiling.
|

 6in Tin Ceiling Patterns


